Metasploitable Write-Up
- Jack Pennington
- Mar 26, 2021
- 4 min read
Updated: Nov 19, 2024
To add some context to the blog, I will be exploiting the Metasploitable 2 machine. The machine will be hosted locally using Oracle Box type 2 hypervisor, it will have only 1GB of RAM assigned and only 10GB of virtual disk space. The network setting will be set-up as a bridge adapter using my local machine's physical network bridge. The Kali machine will be hosted on a VMware ESXi type 1 hypervisor, the VM will be assigned 4 logical CPUs and 16GB of RAM. This machine may appear to be over-recommended specification but I dislike slow virtual machines.
PHASE 1: RECONNAISSANCE
This phase of the penetration testing lifecycle would usually include researching the business or organisation that you are performing the test against, depending on what kind of test is being carried out for example. If this was a white-box penetration test then we would already have the details required to progress, whereas if this was a black-box penetration test we would only get an IP address and maybe a scoping document at most. Due to the nature of the Metasploitable project, this write-up will be a black-box test and we have only been sent an IP address and scoping document, this document details that every type of enumeration and test is permitted against the Metasploitable virtual machine.
PHASE 2: SCANNING
The IP address of the Metasploitable machine is 192.168.0.194, a site I have become quite attached to is www.explainshell.com, this site is useful for breaking down confusing terminals with numerous flags. In this instance, I will be using just the generic Nmap 192.168.0.194 to identify open ports.
Upon examining screenshot one you can see that port 80 is open, meaning the Metasploitable machine is hosting a website. To enumerate and scan this service I will be using a tool named DirBuster, just personal preference I like the GUI version more than the terminal version. The brute force txt file I will be using has been downloaded from GitHub. The DirBuster output has been included for reference.
Referring to screenshot one, you can establish that the machine has a variety of attack vectors available. Moving to the next phase of the cycle I will attempt to enumerate the ports present and then detail the exploitation method below.
PHASE 3: EXPLOITATION
My first attempt at exploitation will be using the information gathered in the above phase, my first attempt will be to test for FTP anonymous login. This vulnerability is present due to the FTP site's incorrect configuration. Fortunately, this misconfiguration does exist on the Metasploitable virtual machine but you cannot create folders using mkdir and also cannot escape the / directory. Screenshot available below.
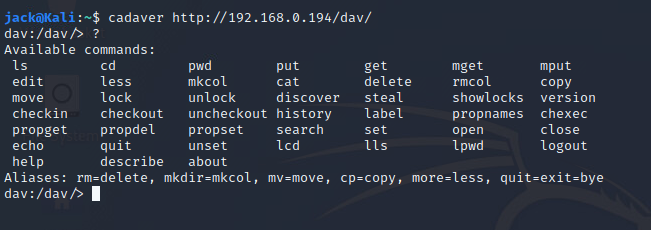
Exploring port 80 reveals the directory 192.168.0.194/DAV this directory reveals the server header much like commencing a banner grab. The banner is Apache 2.2.8 (Ubuntu), to further investigate this banner I will google the header for vulnerabilities. This banner revealed that the Apache banner has a /DAV/ directory available, upon further research you can establish that “WebDAV is an extension of the Hypertext Transfer Protocol that allows clients to perform remote Web content authoring operations.” This open service allows access to the machine's WebDAV account without credentials by using the cadaver WebDAV client for UNIX. This will be detailed in screenshot 4.
This access to WebDAV allows file upload to the WebDAV directory, to upload a malicious payload to Metasploitable we will use the put command and also MSFVENOM to create a PHP reverse shell. The payload created using msfvenom was meterpreter/reverse_tcp. This payload has now been created and is in my documents area. As detailed below in screenshot 5 you can see this payload has been uploaded using the put command. You can confirm if the upload was successful by navigating to the /DAV/ directory. This is displayed in screenshot 6. Now to start up the msfconsole and to select my exploit and payload. A screenshot of my selected exploit and payload will be provided in screenshot 7, now to navigate to /DAV/meterpreter.php and bingo box popped Metasploit shell opened. Now the work begins. Currently, my attempt at privilege escalation is not working at all, vmsplice local privilege escalation is currently not working. Back to the drawing board.
PHASE 4: MAINTAINING ACCESS
Once the box has been popped using the /DAV/ meterpreter.php exploit maintaining access becomes a priority to own the box and its root user and also to access the box anytime, to achieve this goal I used privilege escalation “Linux Kernel 2.6.22 < 3.9 - 'Dirty COW' 'PTRACE_POKEDATA' Race Condition Privilege Escalation” this race condition allows the creation of a user account named “firefart”. In the screenshots added to this blog post, you can see the maintaining access and the root.txt file was captured using SSH @firefart. This account was used to navigate into the msfadmin directory and then using more to view the hash value what I created earlier.
PHASE 5: REPORTING
I feel the above steps have been sufficient to satisfy the report phase of the methodology.
Conclusion
The above details a black-box penetration test of the Metasploitable 2 machine, this write-up includes the basic cycle of the security test from reconnaissance of the business or organisation to the maintaining access phase, to conclude the penetration test it is difficult to say the machine needs to patch its vulnerabilities when it is purposely designed like this. Overall review of the penetration test is excellent, originally I was going to exploit the FTP back door but I decided to stay with the /DAV/ exploit method and I feel this benefitted me, as the FTP backdoor returns a shell as the root user. The method I used required me to learn a lot more about privilege escalation at first I failed using the vmsplice CVE but trying harder as the motto suggests I founder another suitable method that not only gave me a root user privileges shell I also got a user account to maintain access with.


Comments